Pages

Wednesday, November 7, 2012

Remote Debug on Tomcat Server with ANT/Maven Deployment Tool

Hi Guys,

Here I am going to show you the steps to debug web application which are developed using ANT or Maven Deployment Tools.
When ANT or Maven are used to deploy web applications on tomcat server(v.6.0 or 7.0), at that time the war files are deployed automatically.
If DEBUGGING is required then we have to do it remotely. For that we have to do some configurations:

For Windows Users:-

1. Open catalina.bat (PATH: tomcat\bin\catalina.bat) file.
2. find “DEBUG_OPTS=” and modify this property.

set DEBUG_OPTS= -Xdebug -Xrunjdwp:transport=dt_socket,server=y,suspend=n,address=8888

3. Now, Come to Eclipse. And follow this steps:

a) Open debug perspective[Windows->open perspective ->Other->Debug]
b) Run-> Open "Debug" Dialog -> Remote Java Application -> New configuration ->
c) Select the project -> Enter the port number as debug port in the Catalina.bat (8888)

4. Restart the server.
5. Put breakpoints in files.
6. Start Debug from Eclipse.

Now, you are done..

For Linux/ Ubuntu Users:-


1. Go to tomcat/bin/catalina.sh

2. find below line

JAVA_OPTS="$JAVA_OPTS -Djava.util.logging.manager=org.apache.juli.ClassLoaderLogManager"

3. add this line below it

JAVA_OPTS="$JAVA_OPTS -Xdebug -Xrunjdwp:transport=dt_socket,server=y,suspend=n,address=8888"

So now your file looks like this

# Set juli LogManager if it is present
if [ -r "$CATALINA_BASE"/conf/logging.properties ]; then
  JAVA_OPTS="$JAVA_OPTS -Djava.util.logging.manager=org.apache.juli.ClassLoaderLogManager"
  JAVA_OPTS="$JAVA_OPTS -Xdebug -Xrunjdwp:transport=dt_socket,server=y,suspend=n,address=8888"
  LOGGING_CONFIG="-Djava.util.logging.config.file=$CATALINA_BASE/conf/logging.properties"
fi

Save this file

4. Goto Eclipse-->Debug configuration
5. select java remote application->create new configuration
6. source tab - select your project
7. connect tab - add port number 8888
8. restart sever
9. put break points
10. Start Debug from Eclipse.


That's it..
If you are Maven user, then do "Maven Clean" and "Maven Install" and then start your debug configuration.



Friday, August 3, 2012

Integration of Jasper Report with Web Application

Hi Guys,

I have seen many applications in which reporting functionality is required.
To generate Jasper Reports from Web Application, there is some different logic.
To generate reports through Web Applications, you need to write the report content in response of your server.
Here, I am going to show you only mandatory snippet to generate a PDF report using Web Application.
Add following JARs in your project build path.


  • commons-beanutils-1.8.0.jar
  • commons-collections-3.1.jar
  • commons-digester-2.0.jar
  • commons-logging-1.1.1.jar
  • groovy-all-1.5.5.jar
  • iText-2.1.7.jar
  • jasperreports-4.0.1.jar
  • mysql-connector-java-5.1.14-bin.jar


Create a servlet to handle your request for report.
Here is the code of servlet.(only doPost() method is given here)

...
...
...


protected void doPost(HttpServletRequest request, HttpServletResponse response) throws ServletException, IOException {
// TODO Auto-generated method stub
JasperPrint jasperPrint=null;
try {
String reportFileName="<REPORT_FILE_NAME>";
String reportPath="<REPORT_FILE_PATH>"+reportFileName;
String targetFileName=reportFileName.replace(".jrxml", ".pdf");
final JasperReport jasperReport = JasperCompileManager.compileReport(reportPath);
jasperPrint = JasperFillManager.fillReport(jasperReport,null,JDBCConnection.getJDBCConnection());
ServletOutputStream outputstream = response.getOutputStream();
final ByteArrayOutputStream byteArrayOutputStream = new ByteArrayOutputStream();
JasperExportManager.exportReportToPdfStream(jasperPrint, byteArrayOutputStream);
             response.setContentType("application/pdf");
             outputstream.write(byteArrayOutputStream.toByteArray());
             response.setHeader("Cache-Control", "max-age=0");
             response.setHeader("Content-Disposition", "attachment; filename=" + targetFileName);
             // clear the output stream.
             outputstream.flush();
             outputstream.close();
 
 
} catch (final JRException e) {
e.printStackTrace();
}
}


And JDBCConnection is the class, where I have write code to make database connection. Here is the code of JDBCConnnection.java


import java.sql.Connection;
import java.sql.DriverManager;

public final class JDBCConnection
{
    public static Connection getJDBCConnection()
    {
        Connection connection = null;
        try
        {
            Class.forName("com.mysql.jdbc.Driver");
            connection=DriverManager.getConnection("jdbc:mysql://localhost:3306/test","root","root");
        }
        catch(Exception e)
        {
         e.printStackTrace();
        }
        return connection;
    }
}

Call this servlet on simple button click.
When you click on button, you will find that the generated report is asked for downloading by your browser.


Triggers in MySQL


CREATE
    [DEFINER = { user | CURRENT_USER }]
    TRIGGER trigger_name trigger_time trigger_event
    ON tbl_name FOR EACH ROW trigger_body

This statement creates a new trigger. A trigger is a named database object that is associated with a table, and that activates when a particular event occurs for the table. The trigger becomes associated with the table namedtbl_name, which must refer to a permanent table. You cannot associate a trigger with a TEMPORARY table or a view.

The DEFINER clause determines the security context to be used when checking access privileges at trigger activation time. It was added in MySQL 5.0.17.

trigger_time is the trigger action time. It can be BEFORE or AFTER to indicate that the trigger activates before or after each row to be modified.

trigger_event indicates the kind of statement that activates the trigger. The trigger_event can be one of the following:
  • INSERT: The trigger is activated whenever a new row is inserted into the table; for example, through INSERTLOAD DATA, and REPLACE statements.
  • UPDATE: The trigger is activated whenever a row is modified; for example, through UPDATE statements.
  • DELETE: The trigger is activated whenever a row is deleted from the table; for example, through DELETE and REPLACE statements. However, DROP TABLE and TRUNCATE TABLE statements on the table do not activate this trigger, because they do not use DELETE.

It is important to understand that the trigger_event does not represent a literal type of SQL statement that activates the trigger so much as it represents a type of table operation. 

For example, an INSERT trigger is activated by not only INSERT statements but also LOAD DATA statements because both statements insert rows into a table.

A potentially confusing example of this is the INSERT INTO ... ON DUPLICATE KEY UPDATE ... syntax: a BEFORE INSERT trigger will activate for every row, followed by either an AFTER INSERT trigger or both the BEFORE UPDATE and AFTER UPDATE triggers, depending on whether there was a duplicate key for the row.

There cannot be two triggers for a given table that have the same trigger action time and event. For example, you cannot have two BEFORE UPDATE triggers for a table. But you can have a BEFORE UPDATE and a BEFORE INSERTtrigger, or a BEFORE UPDATE and an AFTER UPDATE trigger.

trigger_body is the statement to execute when the trigger activates. If you want to execute multiple statements, use the BEGIN ... END compound statement construct. This also enables you to use the same statements that are permissible within stored routines.

You can refer to columns in the subject table (the table associated with the trigger) by using the aliases OLD and NEWOLD.col_name refers to a column of an existing row before it is updated or deleted. NEW.col_name refers to the column of a new row to be inserted or an existing row after it is updated.

MySQL stores the sql_mode system variable setting that is in effect at the time a trigger is created, and always executes the trigger with this setting in force, regardless of the current server SQL mode.
Example:
CREATE TABLE test1(a1 INT);
CREATE TABLE test2(a2 INT);
CREATE TABLE test3(a3 INT NOT NULL AUTO_INCREMENT PRIMARY KEY);
CREATE TABLE test4(
  a4 INT NOT NULL AUTO_INCREMENT PRIMARY KEY,
  b4 INT DEFAULT 0
);

delimiter $$
CREATE TRIGGER testref BEFORE INSERT ON test1
  FOR EACH ROW BEGIN
    INSERT INTO test2 SET a2 = NEW.a1;
    DELETE FROM test3 WHERE a3 = NEW.a1;
    UPDATE test4 SET b4 = b4 + 1 WHERE a4 = NEW.a1;
  END $$
delimiter ;

INSERT INTO test3 (a3) VALUES
  (NULL), (NULL), (NULL), (NULL), (NULL),
  (NULL), (NULL), (NULL), (NULL), (NULL);

INSERT INTO test4 (a4) VALUES
  (0), (0), (0), (0), (0), (0), (0), (0), (0), (0);

Suppose that you insert the following values into table test1 as shown here:

mysql> INSERT INTO test1 VALUES (1), (3), (1), (7), (1), (8), (4), (4);
Query OK, 8 rows affected (0.01 sec)
Records: 8  Duplicates: 0  Warnings: 0


As a result, the data in the four tables will be as follows:
mysql> SELECT * FROM test1;
+------+
| a1   |
+------+
|    1 |
|    3 |
|    1 |
|    7 |
|    1 |
|    8 |
|    4 |
|    4 |
+------+
8 rows in set (0.00 sec)

mysql> SELECT * FROM test2;
+------+
| a2   |
+------+
|    1 |
|    3 |
|    1 |
|    7 |
|    1 |
|    8 |
|    4 |
|    4 |
+------+
8 rows in set (0.00 sec)

mysql> SELECT * FROM test3;
+----+
| a3 |
+----+
|  2 |
|  5 |
|  6 |
|  9 |
| 10 |
+----+
5 rows in set (0.00 sec)

mysql> SELECT * FROM test4;
+----+------+
| a4 | b4   |
+----+------+
|  1 |    3 |
|  2 |    0 |
|  3 |    1 |
|  4 |    2 |
|  5 |    0 |
|  6 |    0 |
|  7 |    1 |
|  8 |    1 |
|  9 |    0 |
| 10 |    0 |
+----+------+
10 rows in set (0.00 sec)


Wednesday, August 1, 2012

Text Encryption/Decryption using JCE(Java Cryptography Extension) API

Hi Guys,

There are some cases where you need to encrypt some data like passwords.
At that time for server-side encryption and decryption; you need to use JCE (Java Cryptography Extension) API.

The JCE API covers:
  • Symmetric bulk encryption, such as DES, RC2, and IDEA
  • Symmetric stream encryption, such as RC4
  • Asymmetric encryption, such as RSA
  • Password-based encryption (PBE)
  • Key Agreement
  • Message Authentication Codes (MAC)
To use JCE API, you need following jar files, required to add in your project build path.


  • jce1_2_2.jar
  • local_policy.jar
  • sunjce_provider.jar
  • US_export_policy.jar

After adding JARs in build path, you can use the classes and interfaces of JCE API.
Here is the sample code for encrypting and decryption of simple text with DES algorithm using JCE API.


import java.security.InvalidKeyException;
import java.security.NoSuchAlgorithmException;

import javax.crypto.BadPaddingException;
import javax.crypto.Cipher;
import javax.crypto.IllegalBlockSizeException;
import javax.crypto.KeyGenerator;
import javax.crypto.NoSuchPaddingException;
import javax.crypto.SecretKey;

public class EncryptDecrypt {
public static void main(String args[]) throws NoSuchAlgorithmException,
NoSuchPaddingException, InvalidKeyException, IllegalBlockSizeException, BadPaddingException {
Cipher desCipher = Cipher.getInstance("DES");
KeyGenerator myKey = KeyGenerator.getInstance("DES");
SecretKey desKey = myKey.generateKey();
desCipher.init(Cipher.ENCRYPT_MODE, desKey);

byte[] cleartext = "DHAVAL SHAH".getBytes();
byte[] ciphertext = desCipher.doFinal(cleartext);

System.out.println("Encrypted Text:  "+new String(ciphertext));
// Initialize the same cipher for decryption
desCipher.init(Cipher.DECRYPT_MODE, desKey);

// Decrypt the ciphertext
byte[] cleartext1 = desCipher.doFinal(ciphertext);
System.out.println("Decrypted Text:  "+new String(cleartext1));

}
}


OUTPUT:


To Explore more on JCE API, refer this link:


Convert Currency Numbers to Words

Hi Guys,

In Some of your project, there may be requirement to convert currency in words.(i.e. 12.50 = Twelve Rupees Fifty Paise Only).
To fulfill such requirement, here I am showing the Java code that will take input from user for currency(in numbers) and convert it into words.


import java.util.Scanner;
public class ConvertMoneyToNumberMain {
public static void main(String args[]) {
String str2 = "";
NumToWords w = new NumToWords();
Scanner input = new Scanner(System.in);
System.out.print("Enter Money Amount(Rs.Ps): ");
String amt = input.next();
int rupees = Integer.parseInt(amt.split("\\.")[0]);
String str1 = w.convert(rupees);
str1 += " Rupees ";
int paise = Integer.parseInt(amt.split("\\.")[1]);
if (paise != 0) {
str2 += " and";
str2 = w.convert(paise);
str2 += " Paise";
}
System.out.println(str1 + str2 + " Only");
}
}


class NumToWords {
String string;
String st1[] = { "Zero", "One", "Two", "Three", "Four", "Five", "Six",
"Seven", "Eight", "Nine", };
String st2[] = { "Hundred", "Thousand", "Lac", "Crore" };
String st3[] = { "Ten", "Eleven", "Twelve", "Thirteen", "Fourteen",
"Fifteen", "Sixteen", "Seventeen", "Eighteen", "Ninteen", };
String st4[] = { "Twenty", "Thirty", "Fourty", "Fifty", "Sixty", "Seventy",
"Eighty", "Ninty" };


public String convert(int number) {
int n = 1;
int word;
string = "";
while (number != 0) {
switch (n) {
case 1:
word = number % 100;
pass(word);
if (number > 100 && number % 100 != 0) {
show("and ");
}
number /= 100;
break;
case 2:
word = number % 10;
if (word != 0) {
show(" ");
show(st2[0]);
show(" ");
pass(word);
}
number /= 10;
break;
case 3:
word = number % 100;
if (word != 0) {
show(" ");
show(st2[1]);
show(" ");
pass(word);
}
number /= 100;
break;
case 4:
word = number % 100;
if (word != 0) {
show(" ");
show(st2[2]);
show(" ");
pass(word);
}
number /= 100;
break;
case 5:
word = number % 100;
if (word != 0) {
show(" ");
show(st2[3]);
show(" ");
pass(word);
}
number /= 100;
break;
}
n++;
}
return string;
}


public void pass(int number) {
int word, q;
if (number < 10) {
show(st1[number]);
}
if (number > 9 && number < 20) {
show(st3[number - 10]);
}
if (number > 19) {
word = number % 10;
if (word == 0) {
q = number / 10;
show(st4[q - 2]);
} else {
q = number / 10;
show(st1[word]);
show(" ");
show(st4[q - 2]);
}
}
}


public void show(String s) {
String st;
st = string;
string = s;
string += st;
}
}


OUTPUT:


Generate Parameterized Jasper Reports using Java

Hi Guys,

Here I am going to show you the code using which you can generate Simple Static Jasper Reports from simple Java Application.
First of all, to generate Jasper Reports you need to add following JAR files in your project build path:


  • commons-beanutils-1.8.0.jar
  • commons-collections-3.1.jar
  • commons-digester-2.0.jar
  • commons-logging-1.1.1.jar
  • groovy-all-1.5.5.jar
  • iText-2.1.7.jar
  • jasperreports-4.0.1.jar
  • mysql-connector-java-5.1.14-bin.jar


After adding these JARs in project build path, try out this code:

import net.sf.jasperreports.engine.JRException;
import net.sf.jasperreports.engine.JasperCompileManager;
import net.sf.jasperreports.engine.JasperExportManager;
import net.sf.jasperreports.engine.JasperFillManager;
import net.sf.jasperreports.engine.JasperPrint;
import net.sf.jasperreports.engine.JasperReport;


public class GenerateReport {
public static void main(String args[])
{
JasperPrint jasperPrint=null;
try {
String reportPath="<PATH_TO_YOUR_REPORT_JRXML_FILE>";
String targetPath=reportPath.replace(".jrxml", ".pdf");
final JasperReport jasperReport = JasperCompileManager.compileReport(reportPath);
jasperPrint = JasperFillManager.fillReport(jasperReport,setParameters(),JDBCConnection.getJDBCConnection());
JasperExportManager.exportReportToPdfFile(jasperPrint,targetPath);


} catch (final JRException e) {
e.printStackTrace();
}
}

public static Map<String, String> setParameters() {
final Map<String, String> parameters = new HashMap<String, String>(4,1.0f);
parameters.put("student_name", "Ankit");
return parameters;
}
}

In the above code, <PATH_TO_YOUR_REPORT_JRXML_FILE> is the path to your JRXML file i.e. "E:/report1.jrxml"
Here, to pass parameter to JRXML files, I have made setParameters() method.
To set parameters value in the specified parameters' in JRXML file, give the same parameter name as you have given in JRXML file.
i.e. Here I have given parameter name "student_name" in JRXML file, so I am passing parameter with the key "student_name" to set its value in JRXML file.


And JDBCConnection is the class, where I have write code to make database connection. Here is the code of JDBCConnnection.java


import java.sql.Connection;
import java.sql.DriverManager;

public final class JDBCConnection
{
    public static Connection getJDBCConnection()
    {
        Connection connection = null;
        try
        {
            Class.forName("com.mysql.jdbc.Driver");
            connection=DriverManager.getConnection("jdbc:mysql://localhost:3306/test","root","root");
        }
        catch(Exception e)
        {
         e.printStackTrace();
        }
        return connection;
    }
}


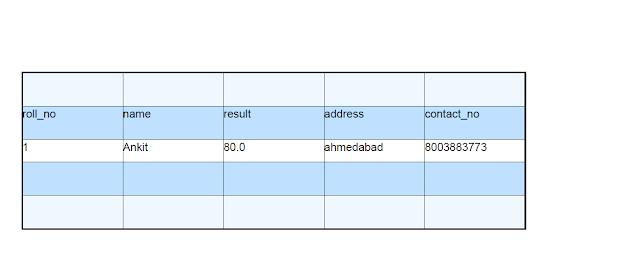
After running this code, you will find a generated PDF File on the same path where you put your JRXML file.
Here is the snapshot of generated PDF File.